Brushstroke Pro for iPad User Guide
Brushstroke Pro for iPad turns your photos and videos into beautiful and striking paintings instantly. Brushstroke Pro is also available on Mac. Read the Brushstroke Pro for Mac User Guide here.
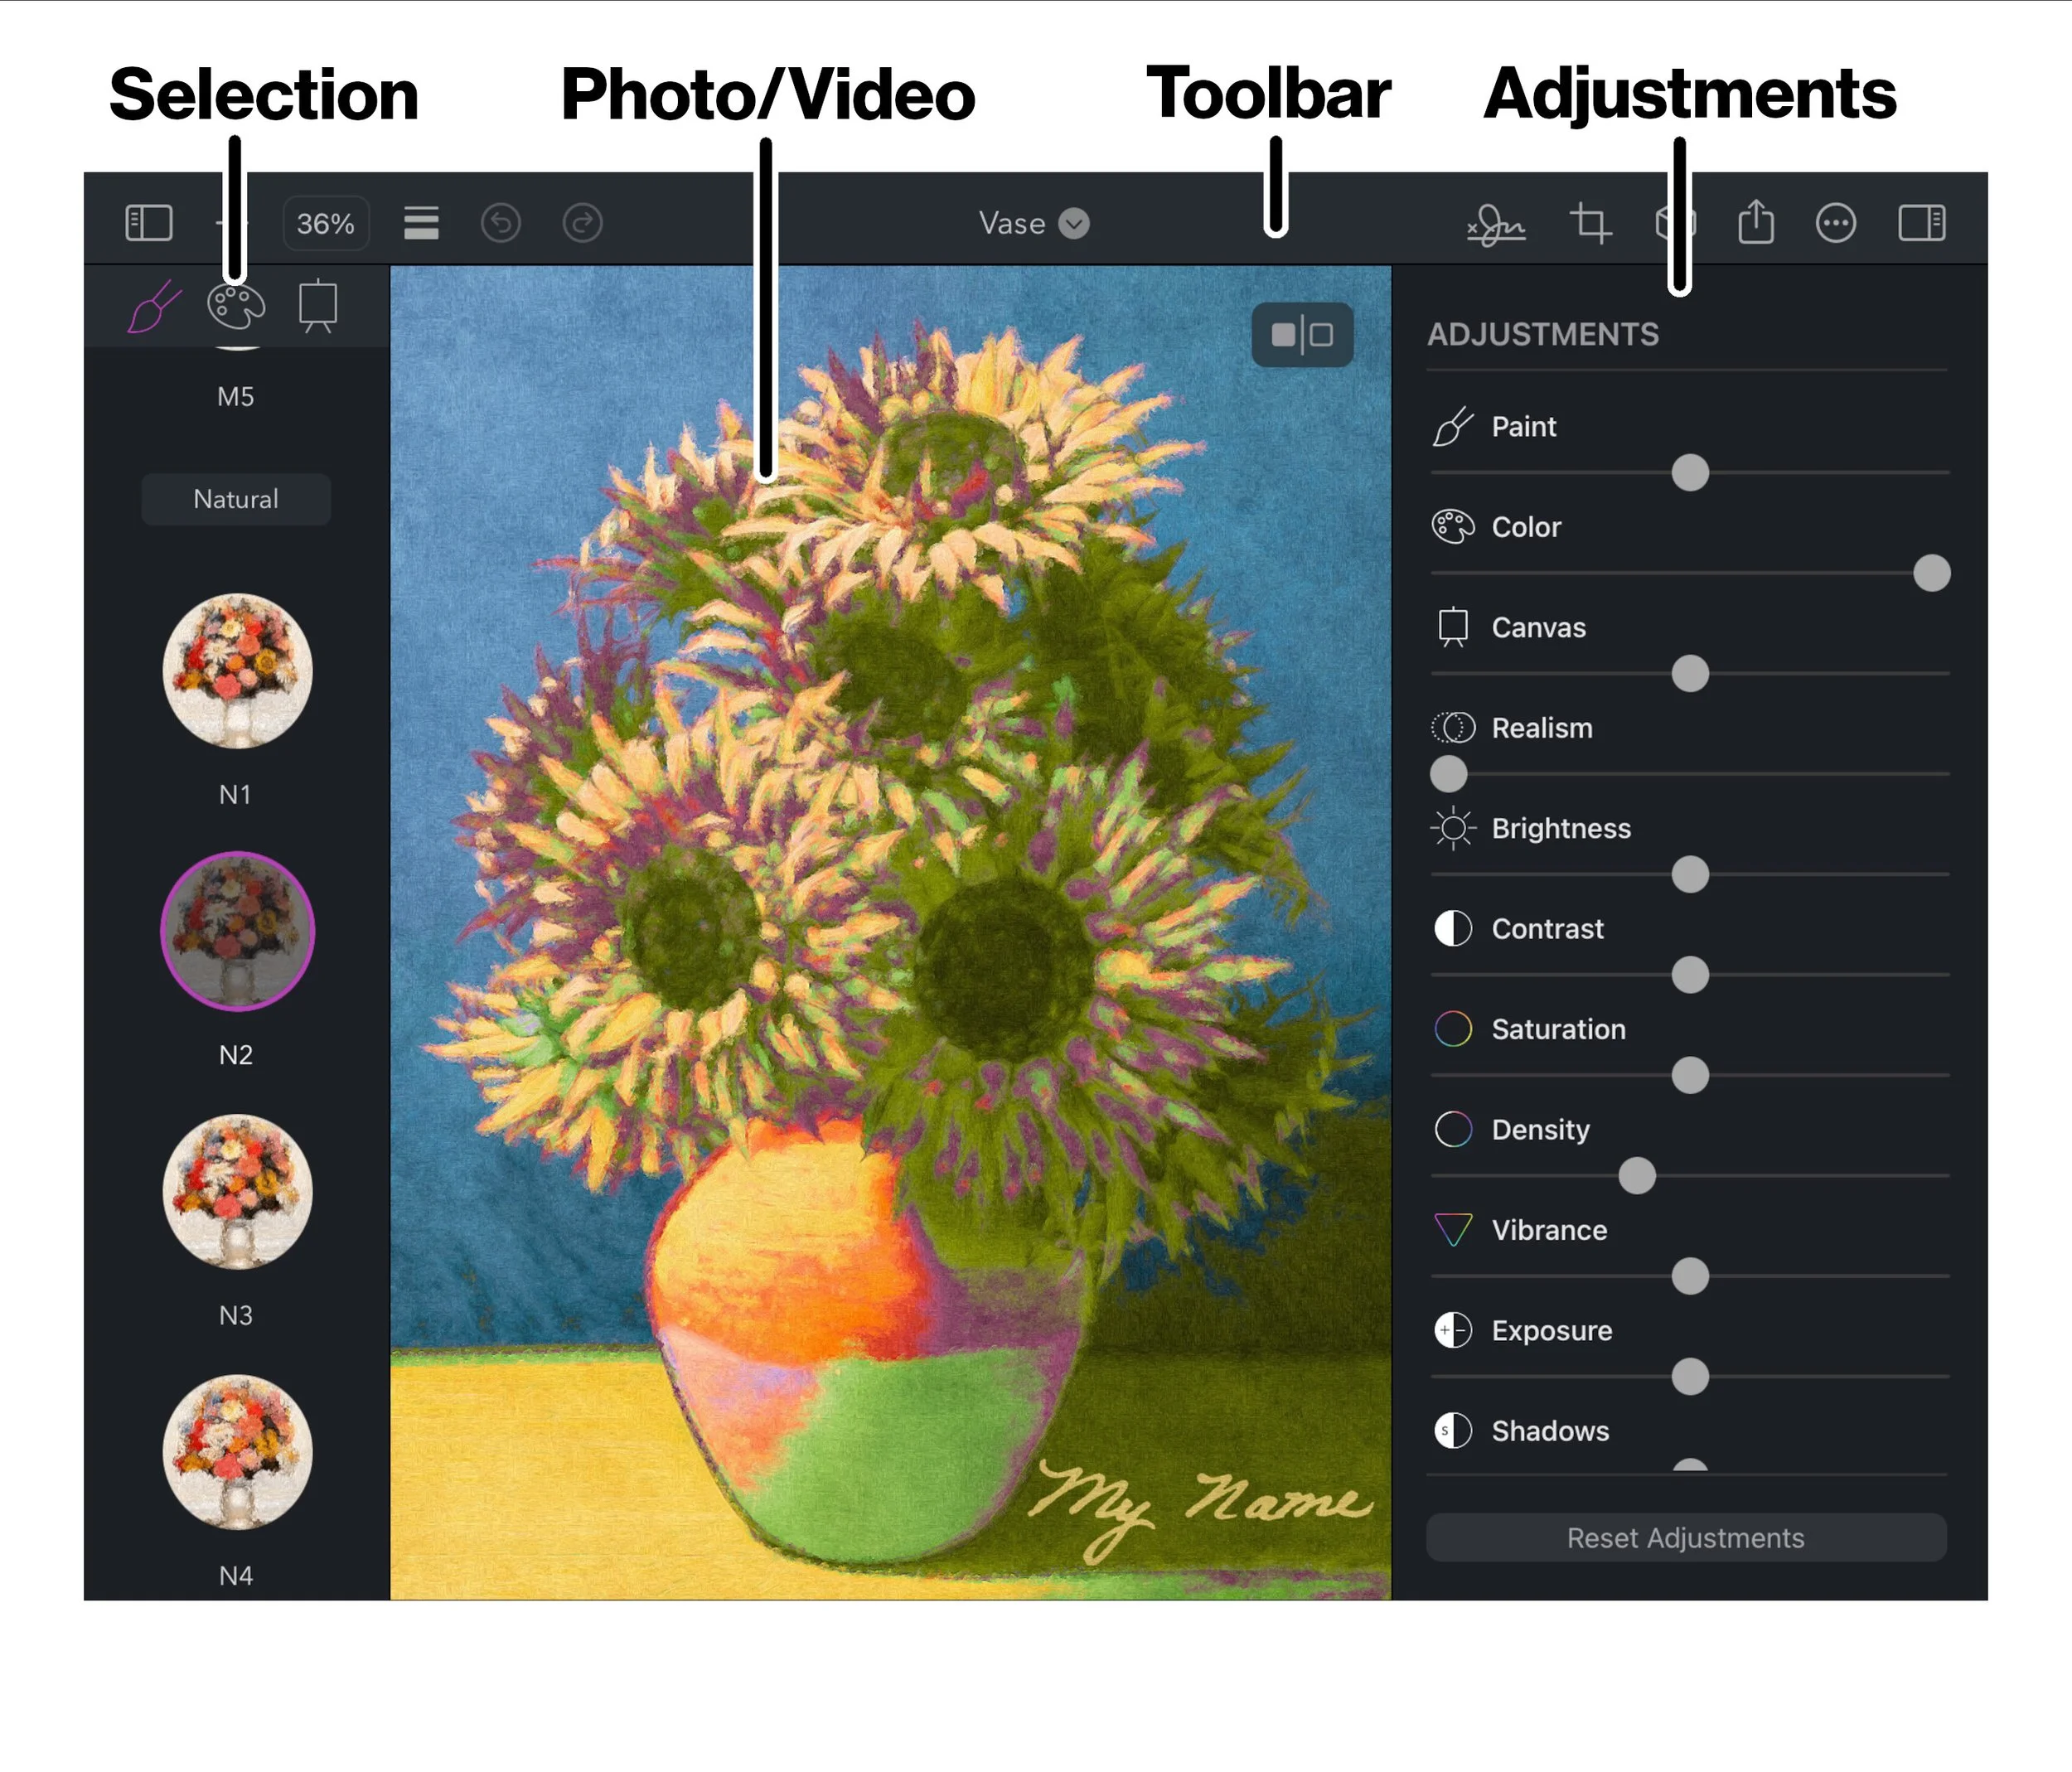
Brushstroke Pro has a single-window interface that consists of the Photo/Video window at the center, the Style/Palette/Canvas Selection sidebar to the left, the Toolbar at the top, and Adjustments sidebar to the right.
Loading a Photo or Video
You can load a photo or video from the Photo Library, the camera, or a file. These options are accessed from the Toolbar.
Project
A Brushstroke Pro project contains your photo/video and all the settings, such as the style, adjustments, signature, and more, that you used to create your art. At any time, you can save your artwork as a project from the Project Menu and load it later.
From the Project Menu, select Revert to Saved Project to revert any changes you have made back to those from the project. Alternatively, select Reset to Default to revert any changes you have made back to the defaults of a new project.
Tip: Brushstroke Pro is available on both the Mac and iPad. Use your iCloud Drive to easily share projects between your Mac and iPad, allowing you to continue your artwork on either device.
Photo/Video
The Photo/Video display shows the painting you are creating.
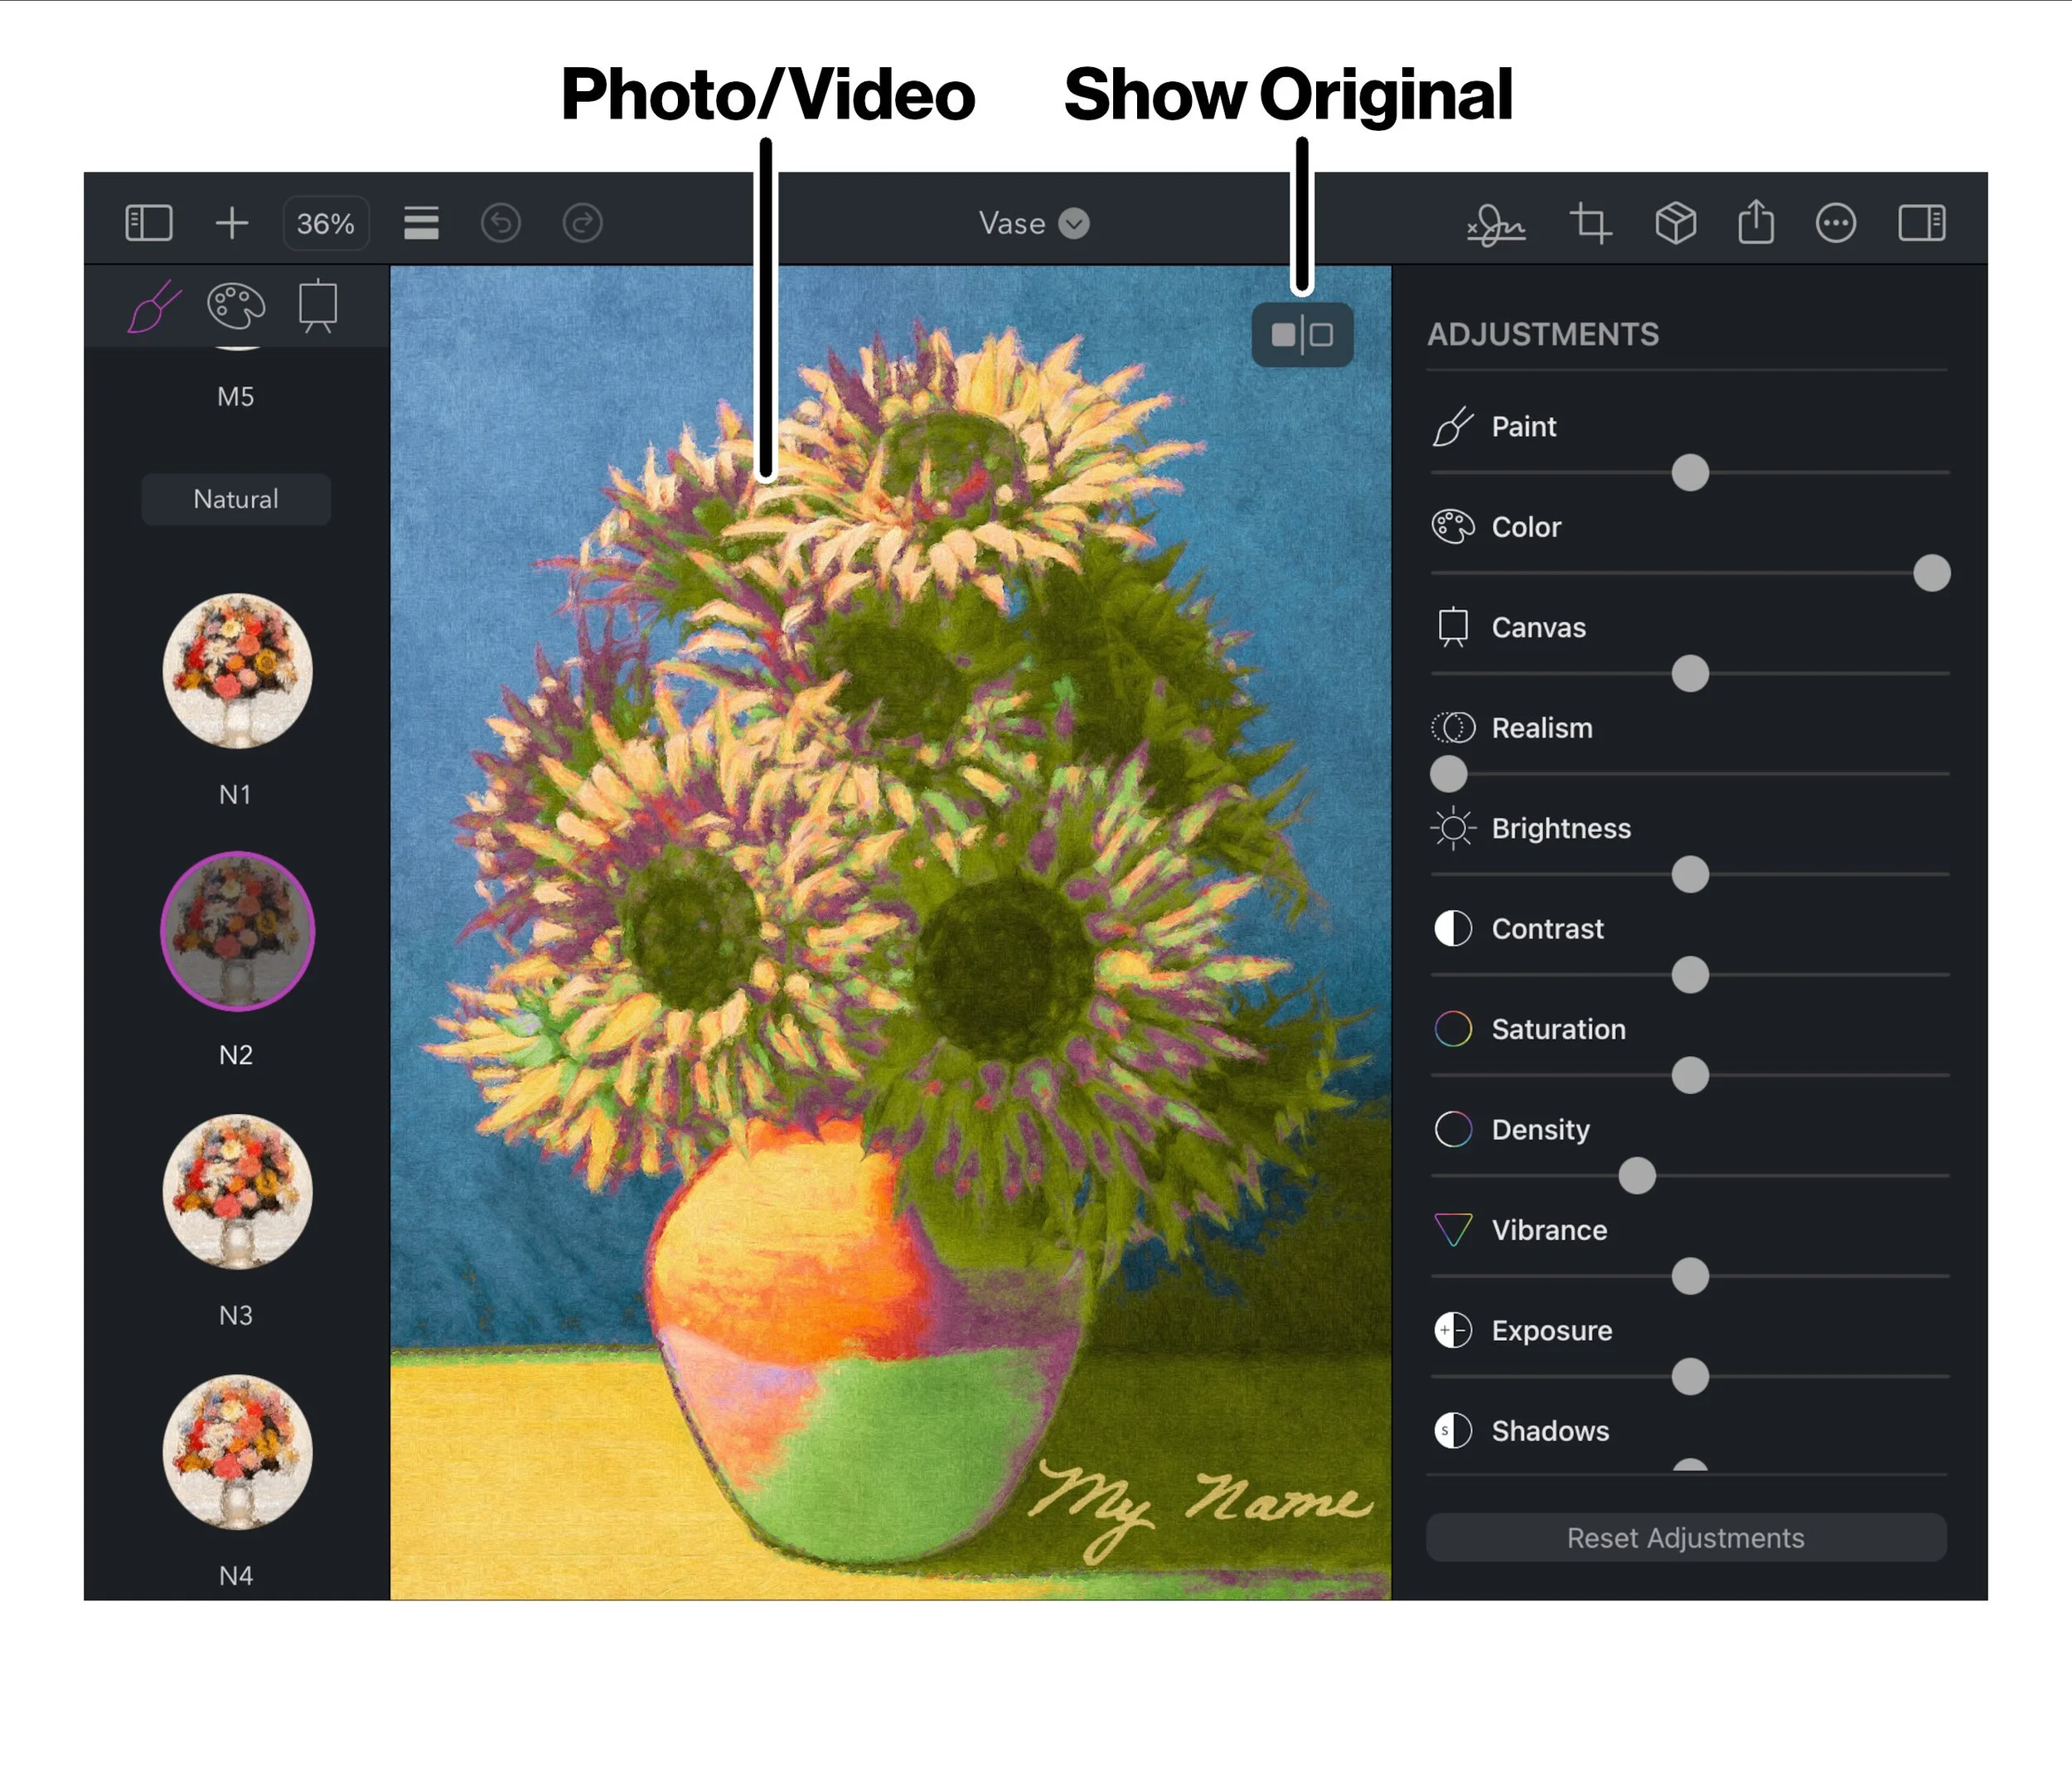
Show Original
Tap and hold on Show Original to compare your art with the original.
Tip: Use the keyboard o key to toggle Show Original.
Zoom
Touch-and-hold on the Photo/Video display to bring up the Zoom menu, which has multiple zoom options. A double-tap will toggle between Zoom to Fit and 100%.
Pinch to zoom. You can also zoom from the Toolbar.
Move
Touch-and-hold and drag to move the image when you are zoomed in.
Video
When a video is loaded, a Play icon will appear on the video that, when tapped, allows you to play the movie using the currently selected style. The video will likely not play at full frame rate when previewing, but when saved, the frame rate will be as expected.
Tip: Use the spacebar key to alternately start and stop the video.
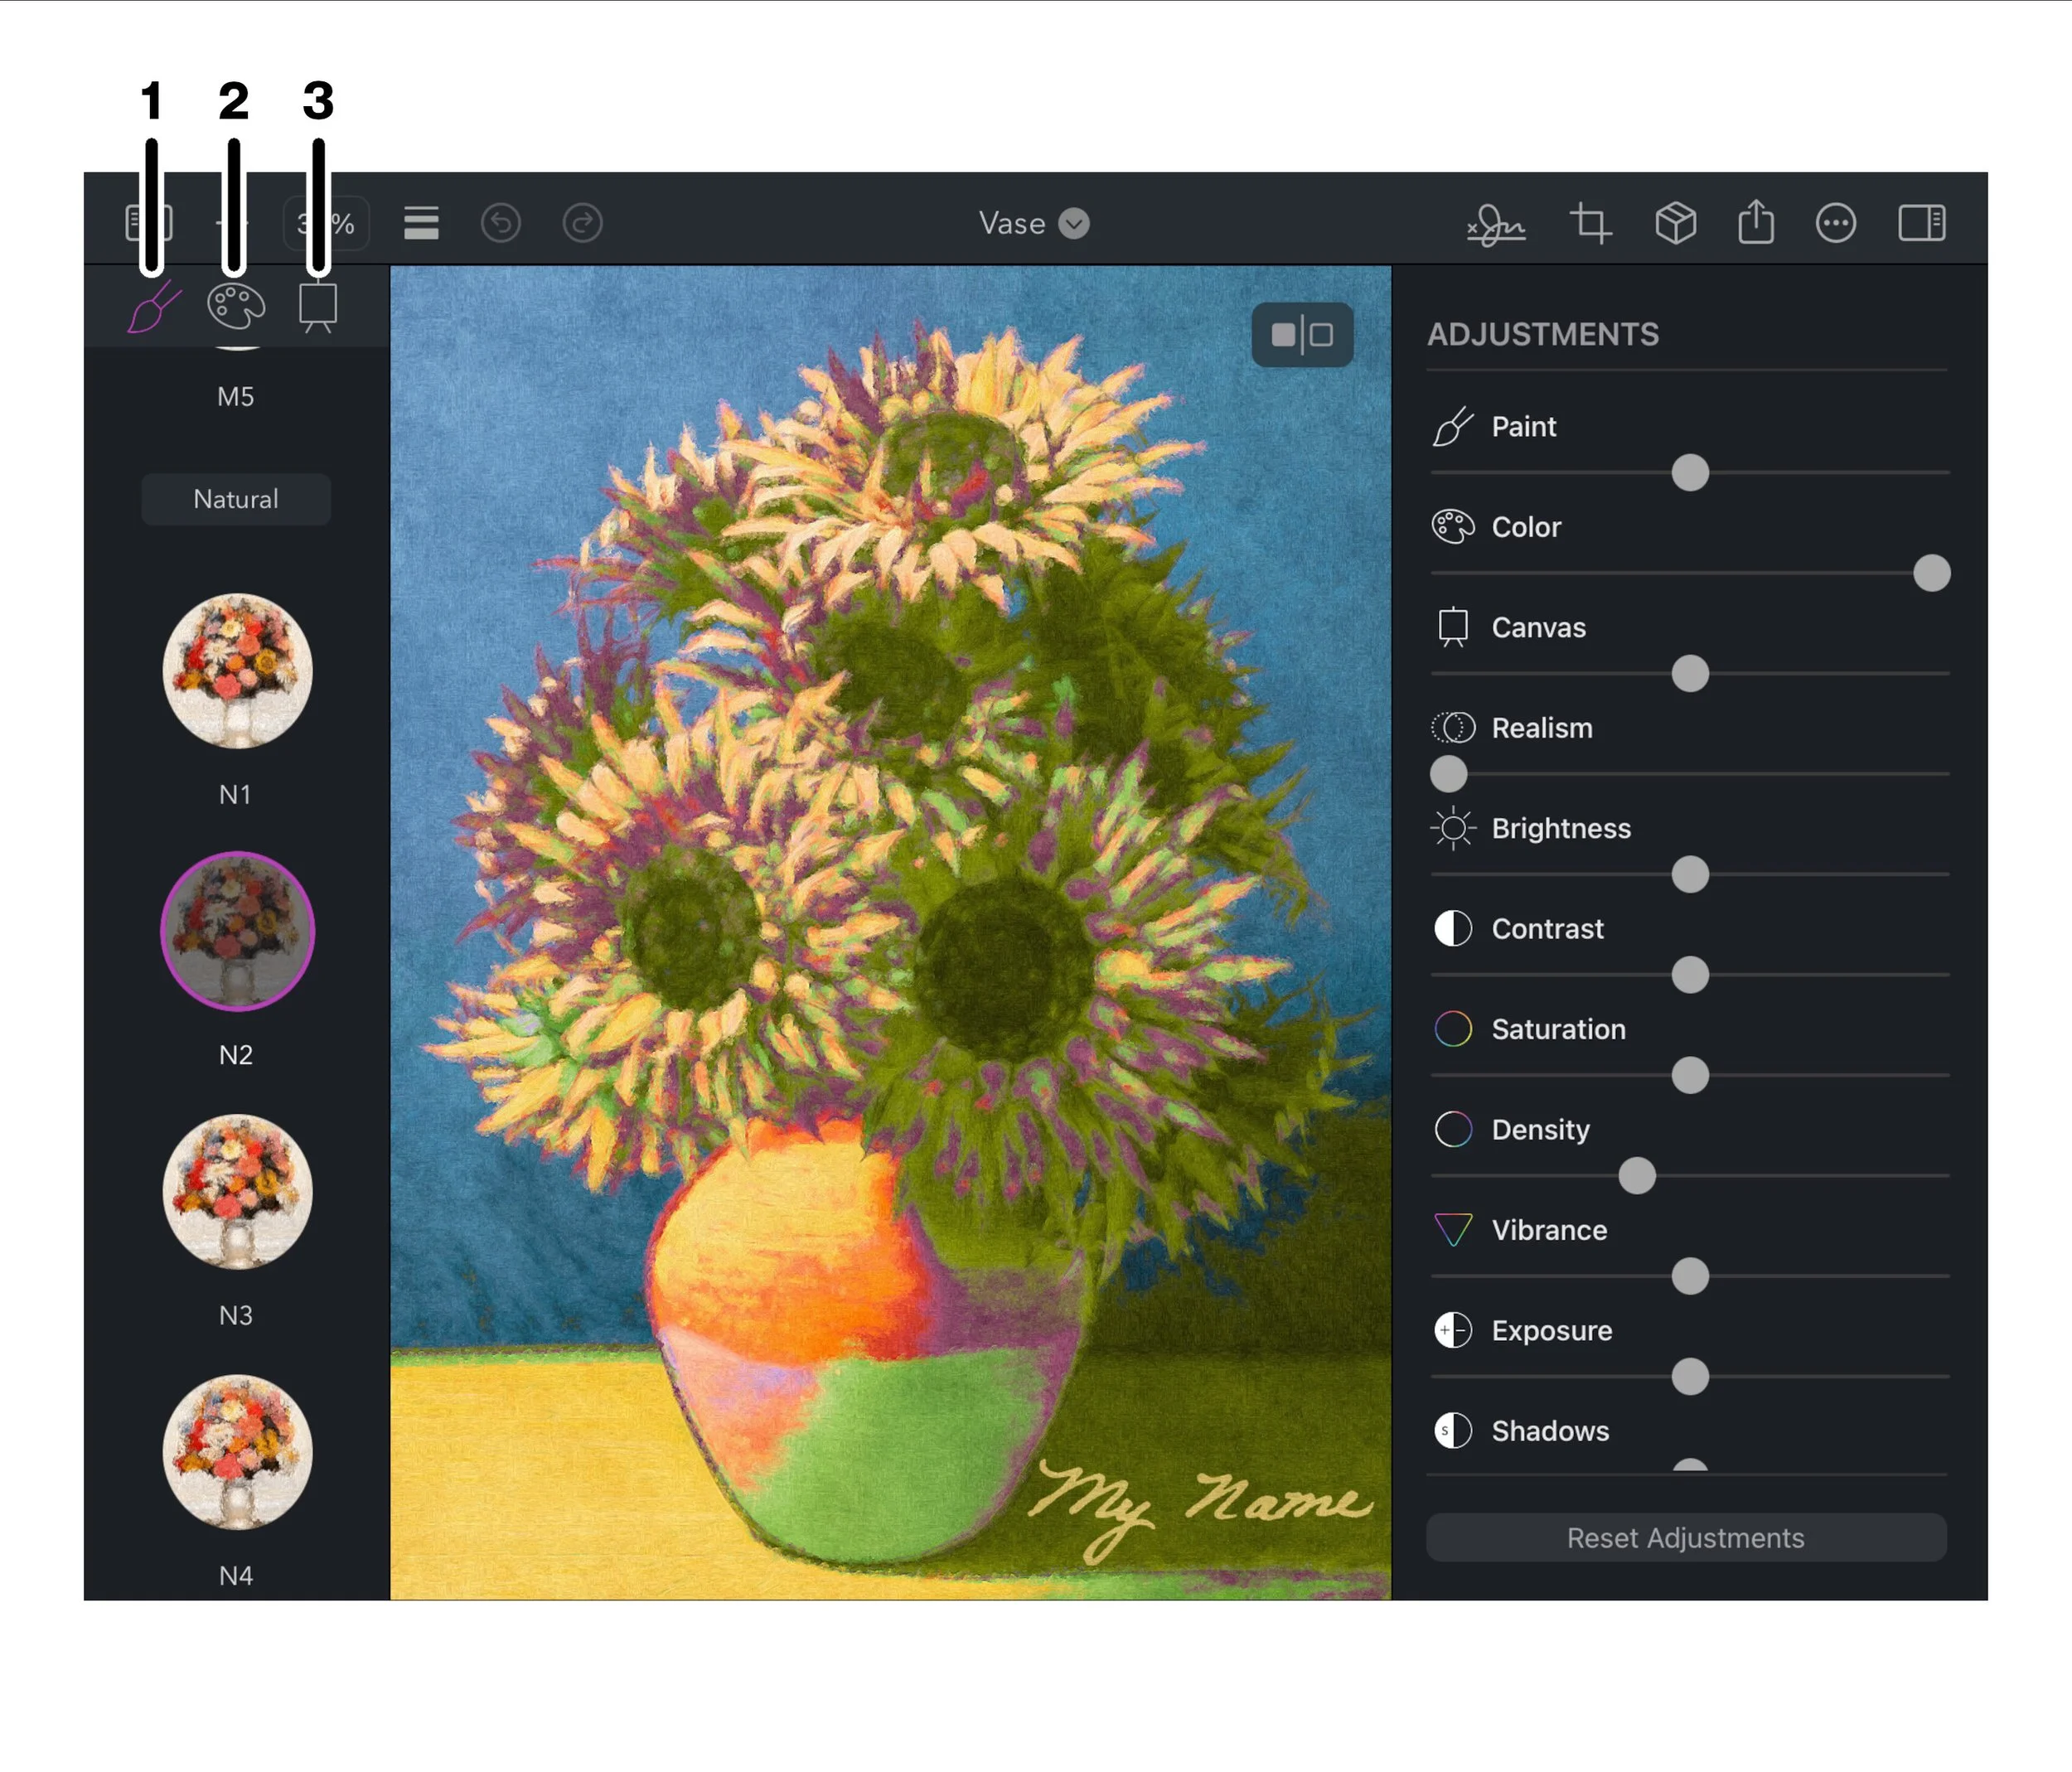
Style/Palette/Canvas Selection
The Style/Palette/Canvas Selection sidebar to the left of the window allows you to choose different styles, color palettes, and canvases. These settings, in addition to Adjustments, have the greatest impact on the look of your art.
Styles determine the medium of your art, such as oil, watercolor, acrylic, and others, in addition to the different styles in those mediums. They are grouped by similarity in a scrollable list.
Color Palettes change the colors and tonality of your art to evoke different moods found in many schools of art. They are in a scrollable list.
Canvases define the different types of canvases and other materials, like wood or stone, to which the paint is applied. They are grouped by similarity in a scrollable list.
Favorites
Touch-and-hold on any style, color palette, or canvas to Add to Favorites. Favorites are placed at the top of their list for easy access to those you use most. Touch-and-hold on a favorite to Remove from Favorites.
To rearrange your Favorites, drag a favorite to the desired position.
Tip: For Styles, Color Palettes, and Canvases, use the keyboard up and down arrow keys to move up and down the list.
Toolbar
The toolbar at the top of the window gives you access to quick actions. The actions include import, zoom, Crop, Share, Adjustments, and others.

Tap the Style/Palette/Canvas Selection sidebar icon to slide the Style/Palette/Canvas Selection in or out.
Tap the Import icon to import a photo or video from the Photos library, the camera, or a file.
Tap the Zoom icon to select preset zoom levels or zoom to fit your photo or video to the window.
Tap the Detail icon to show the drop-down menu of different detail levels, where the first item in the menu is the finest detail and the last, the coarsest. A finer detail creates a more precise painting, while coarser creates a more abstract painting.
These two icons are for Undo and Redo.
This is the Project Menu.
The Signature icon brings up the Signature panel.
Tap the Crop icon to crop your photo.
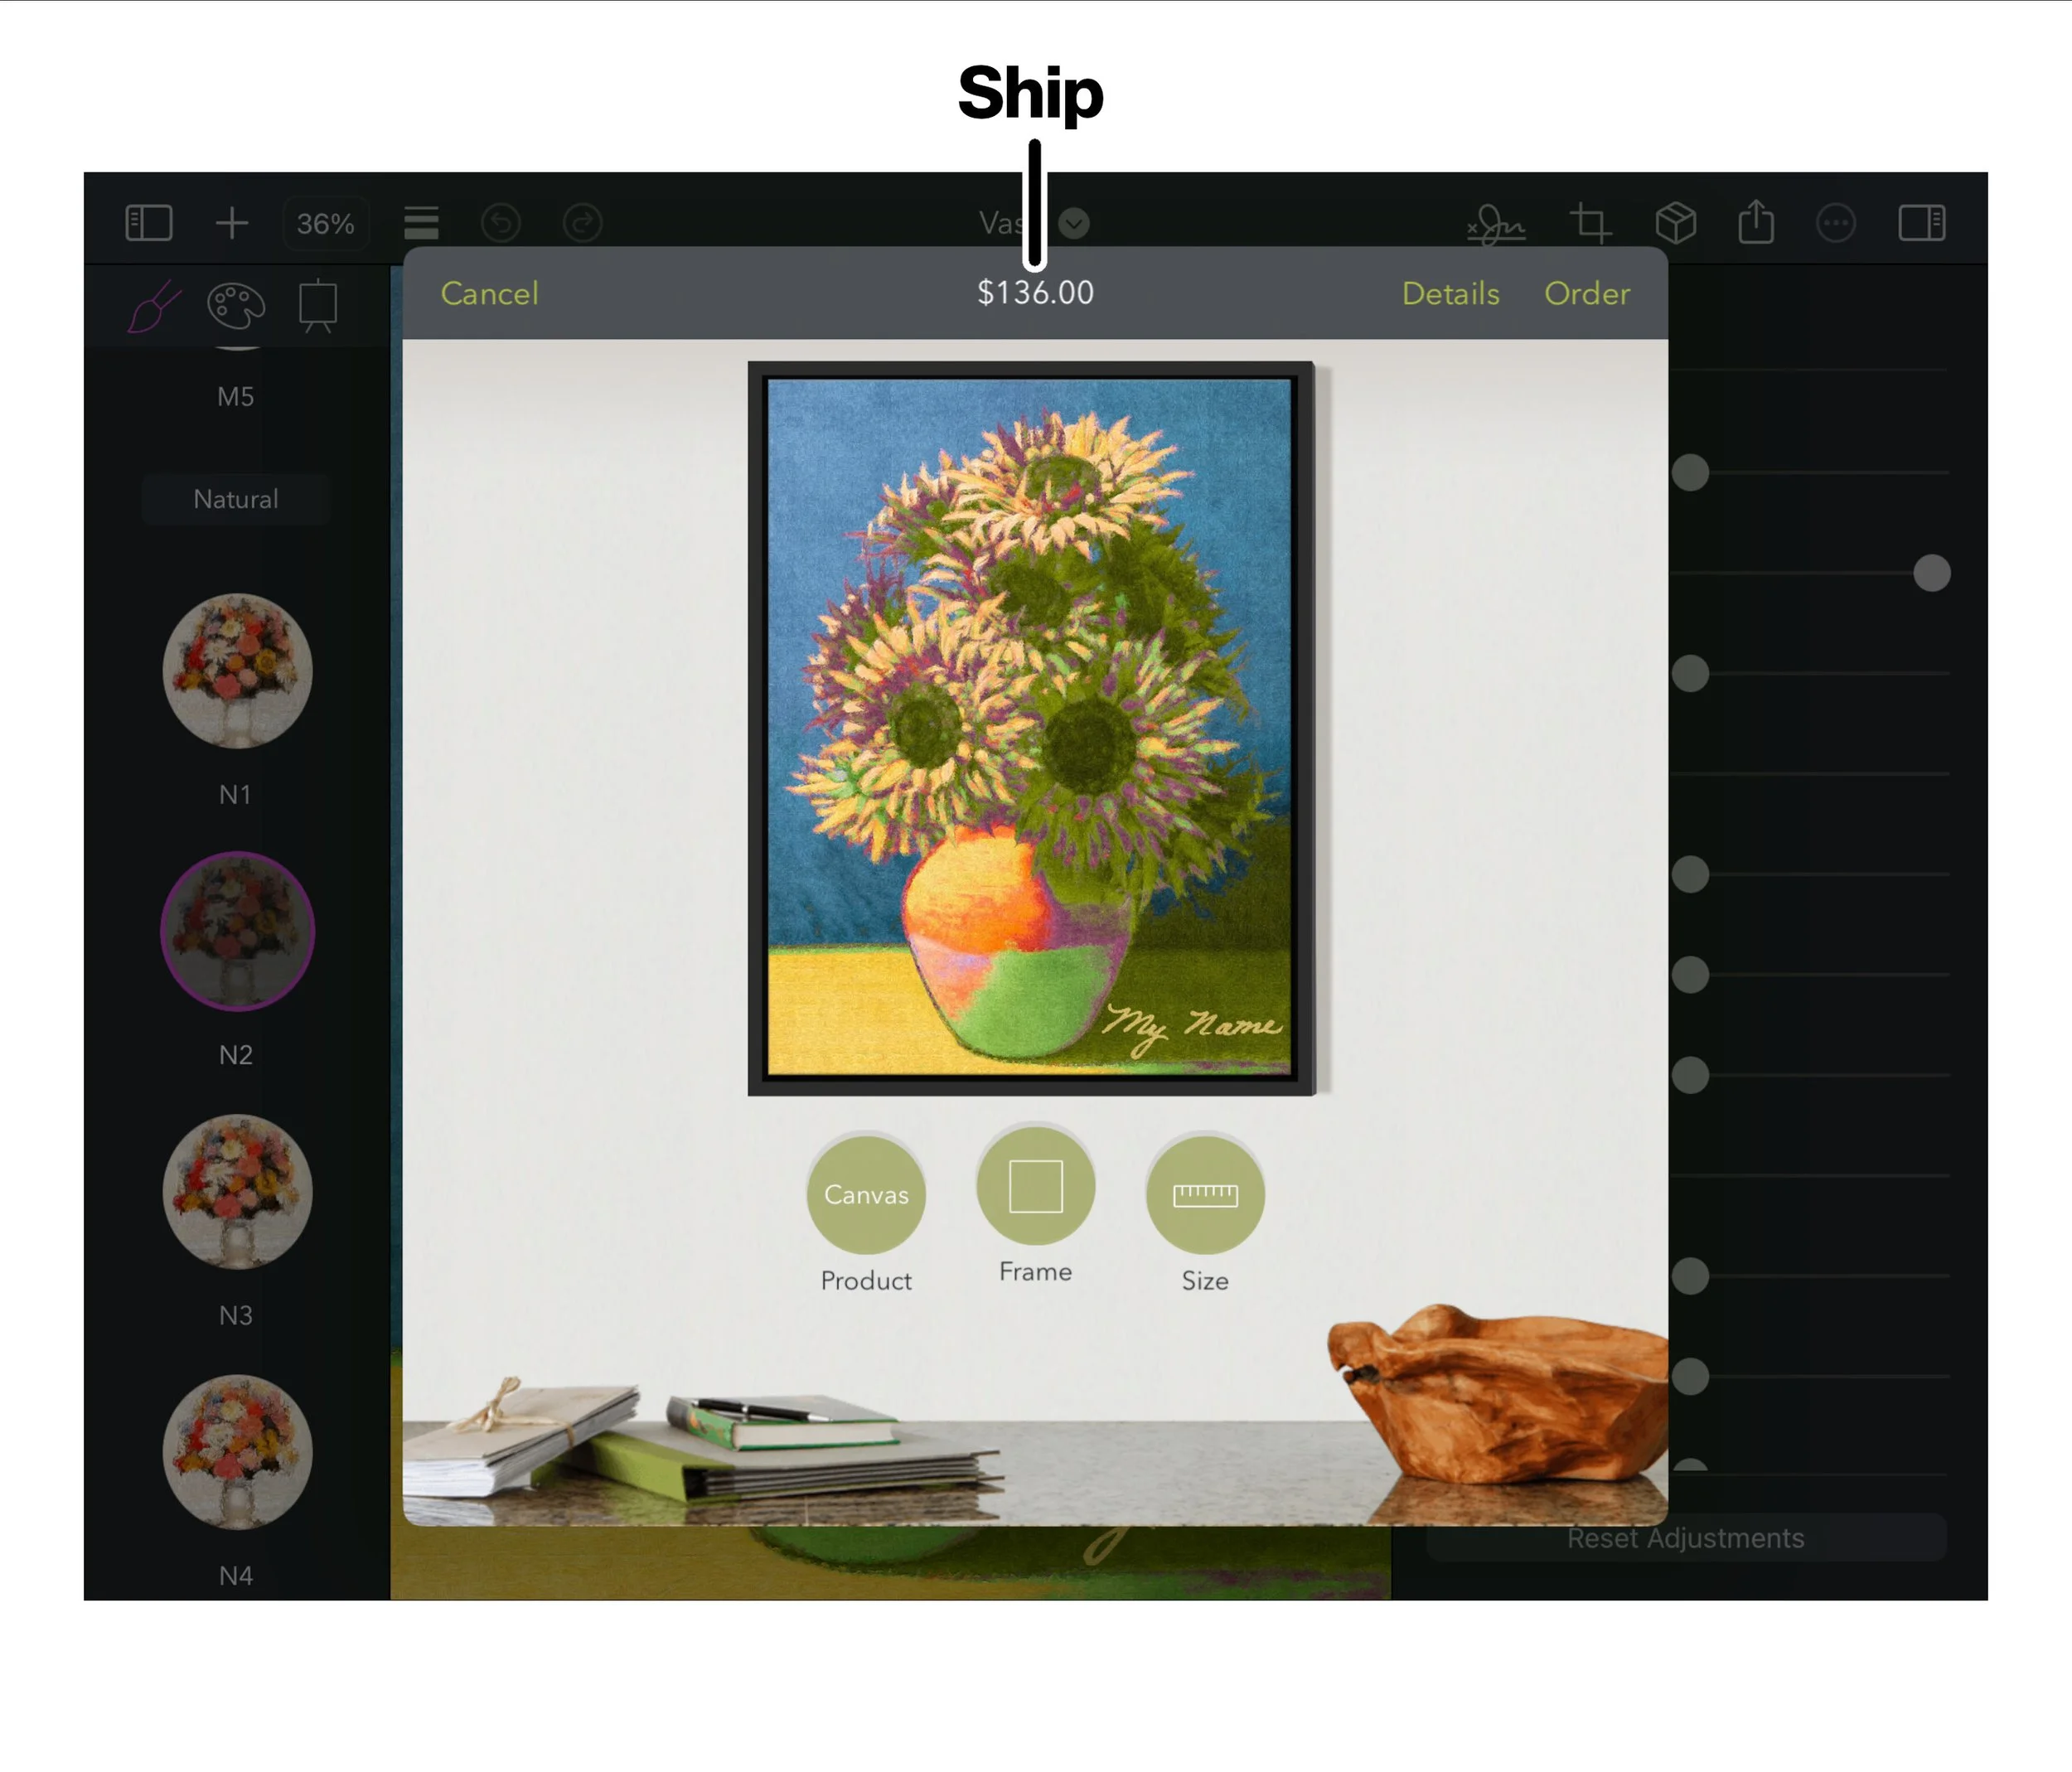
The Ship icon brings up the Ship panel, where you may purchase a print of your art.
Tap the Share icon to share your art.
This is the More Menu.
Tap the Adjustments icon to hide or show the sidebar that lets you make adjustments, like contrast and saturation, among many others.
Project Menu
The Project Menu shows the title of your Project. After loading a previously saved project, if you make any changes, the word “Edited” will appear next to the title. This menu has these app-specific actions:
New Project - Create a new project.
Open Project… - Open your saved project.
Save Project - Save your named project.
Save Project As… - Name and save your project.
Revert to Saved Project - Revert any changes you have made back to those from the saved project.
Reset to Default - Reset any changes you have made back to the defaults of a new project.
Signature
Personalize your art with your signature. Create new signatures, choose their color, and apply them to your painting. It is accessed from the Toolbar.
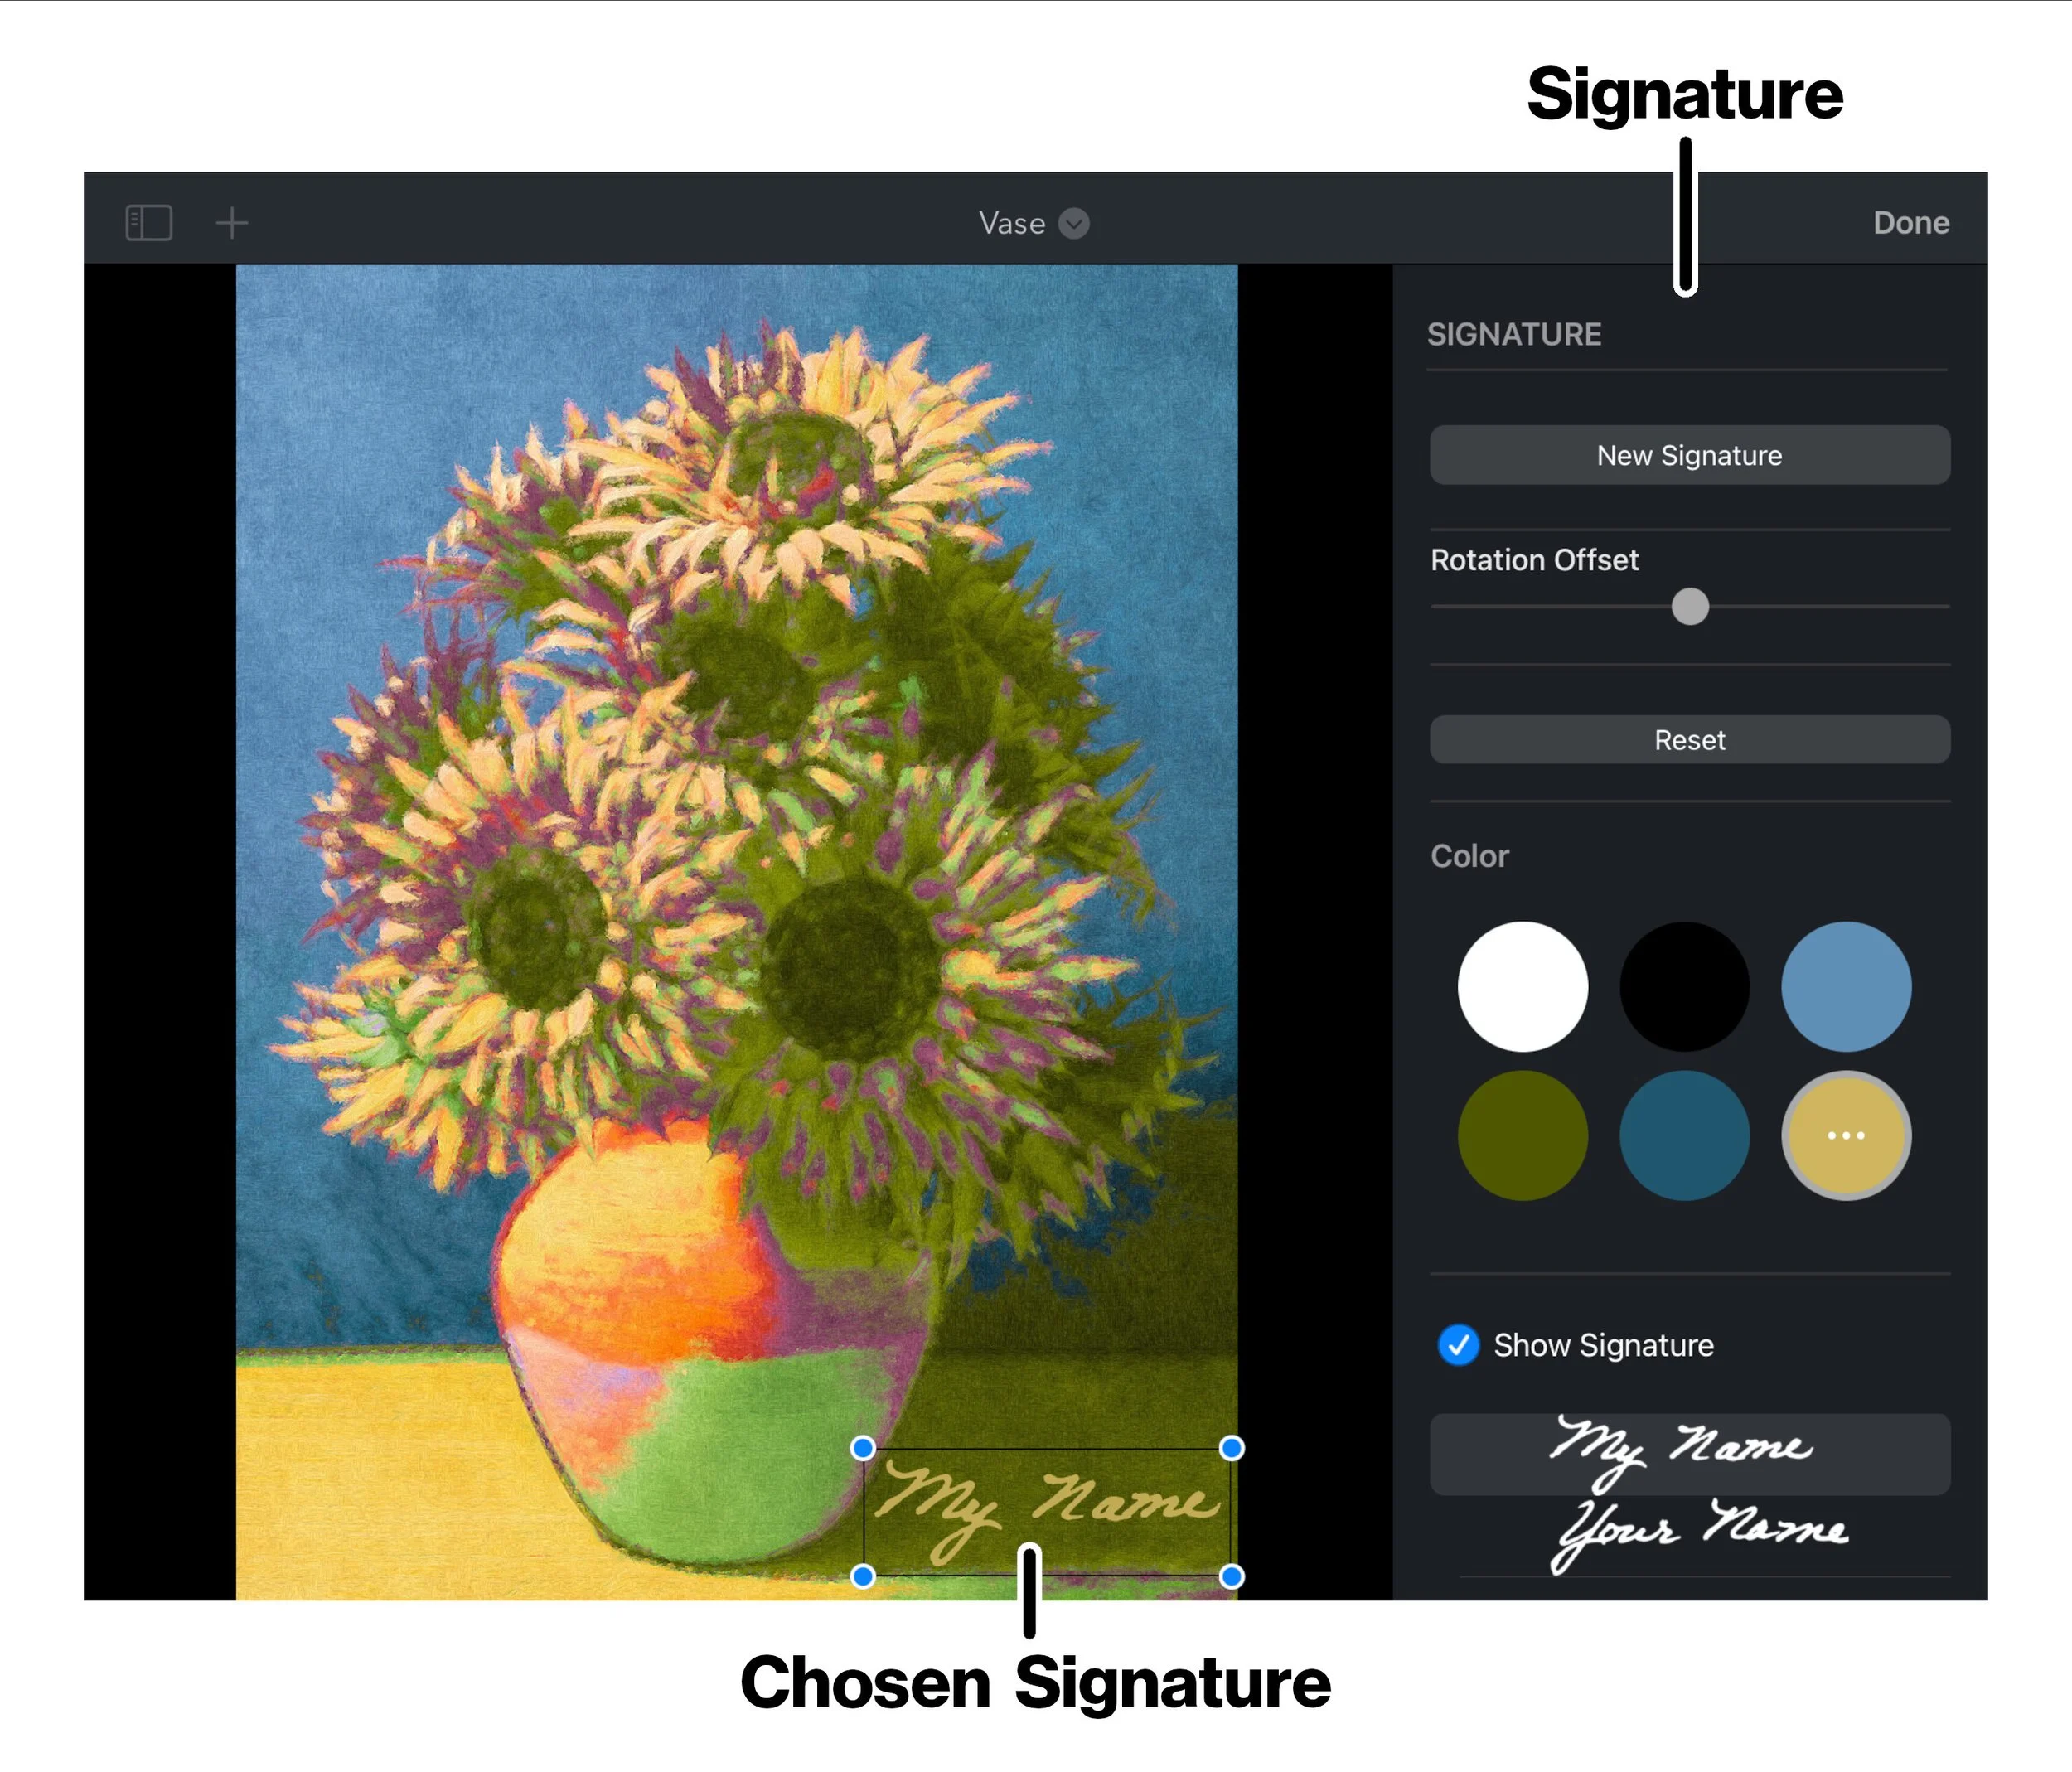
Tap New Signature to add a new signature.
Use the Rotation Offset slider to rotate the signature.
Tap Reset to reset all signature parameters to their default values.
Under Color, choose the color of your signature. Create a custom color by tapping on the color with the ellipses.
Tap the checkbox for Show Signature to turn on or off your signature on the artwork.
Below Show Signature is the list of signatures you have added. Tap on a signature to select it for use. These are saved automatically and will be available between Brushstroke Pro sessions. If you load a project that has a signature that is not one of your saved signatures, that signature will be added and saved. To delete a signature, swipe left.
Move and Rotate
While in Signature, you can move, scale, and rotate the Chosen Signature. A box encloses the signature. Touch-and-hold inside the box and drag to move the signature. Touch-and-hold and drag any box corner to scale it. Use two fingers and rotate them around their center to rotate it. Alternatively, use Rotation Offset in the interface to rotate it.
New Signature
There are thee ways to create a signature: Sign, Photo, and Camera. In the interface, tap one of the methods at the top and follow the directions shown at the center and bottom.
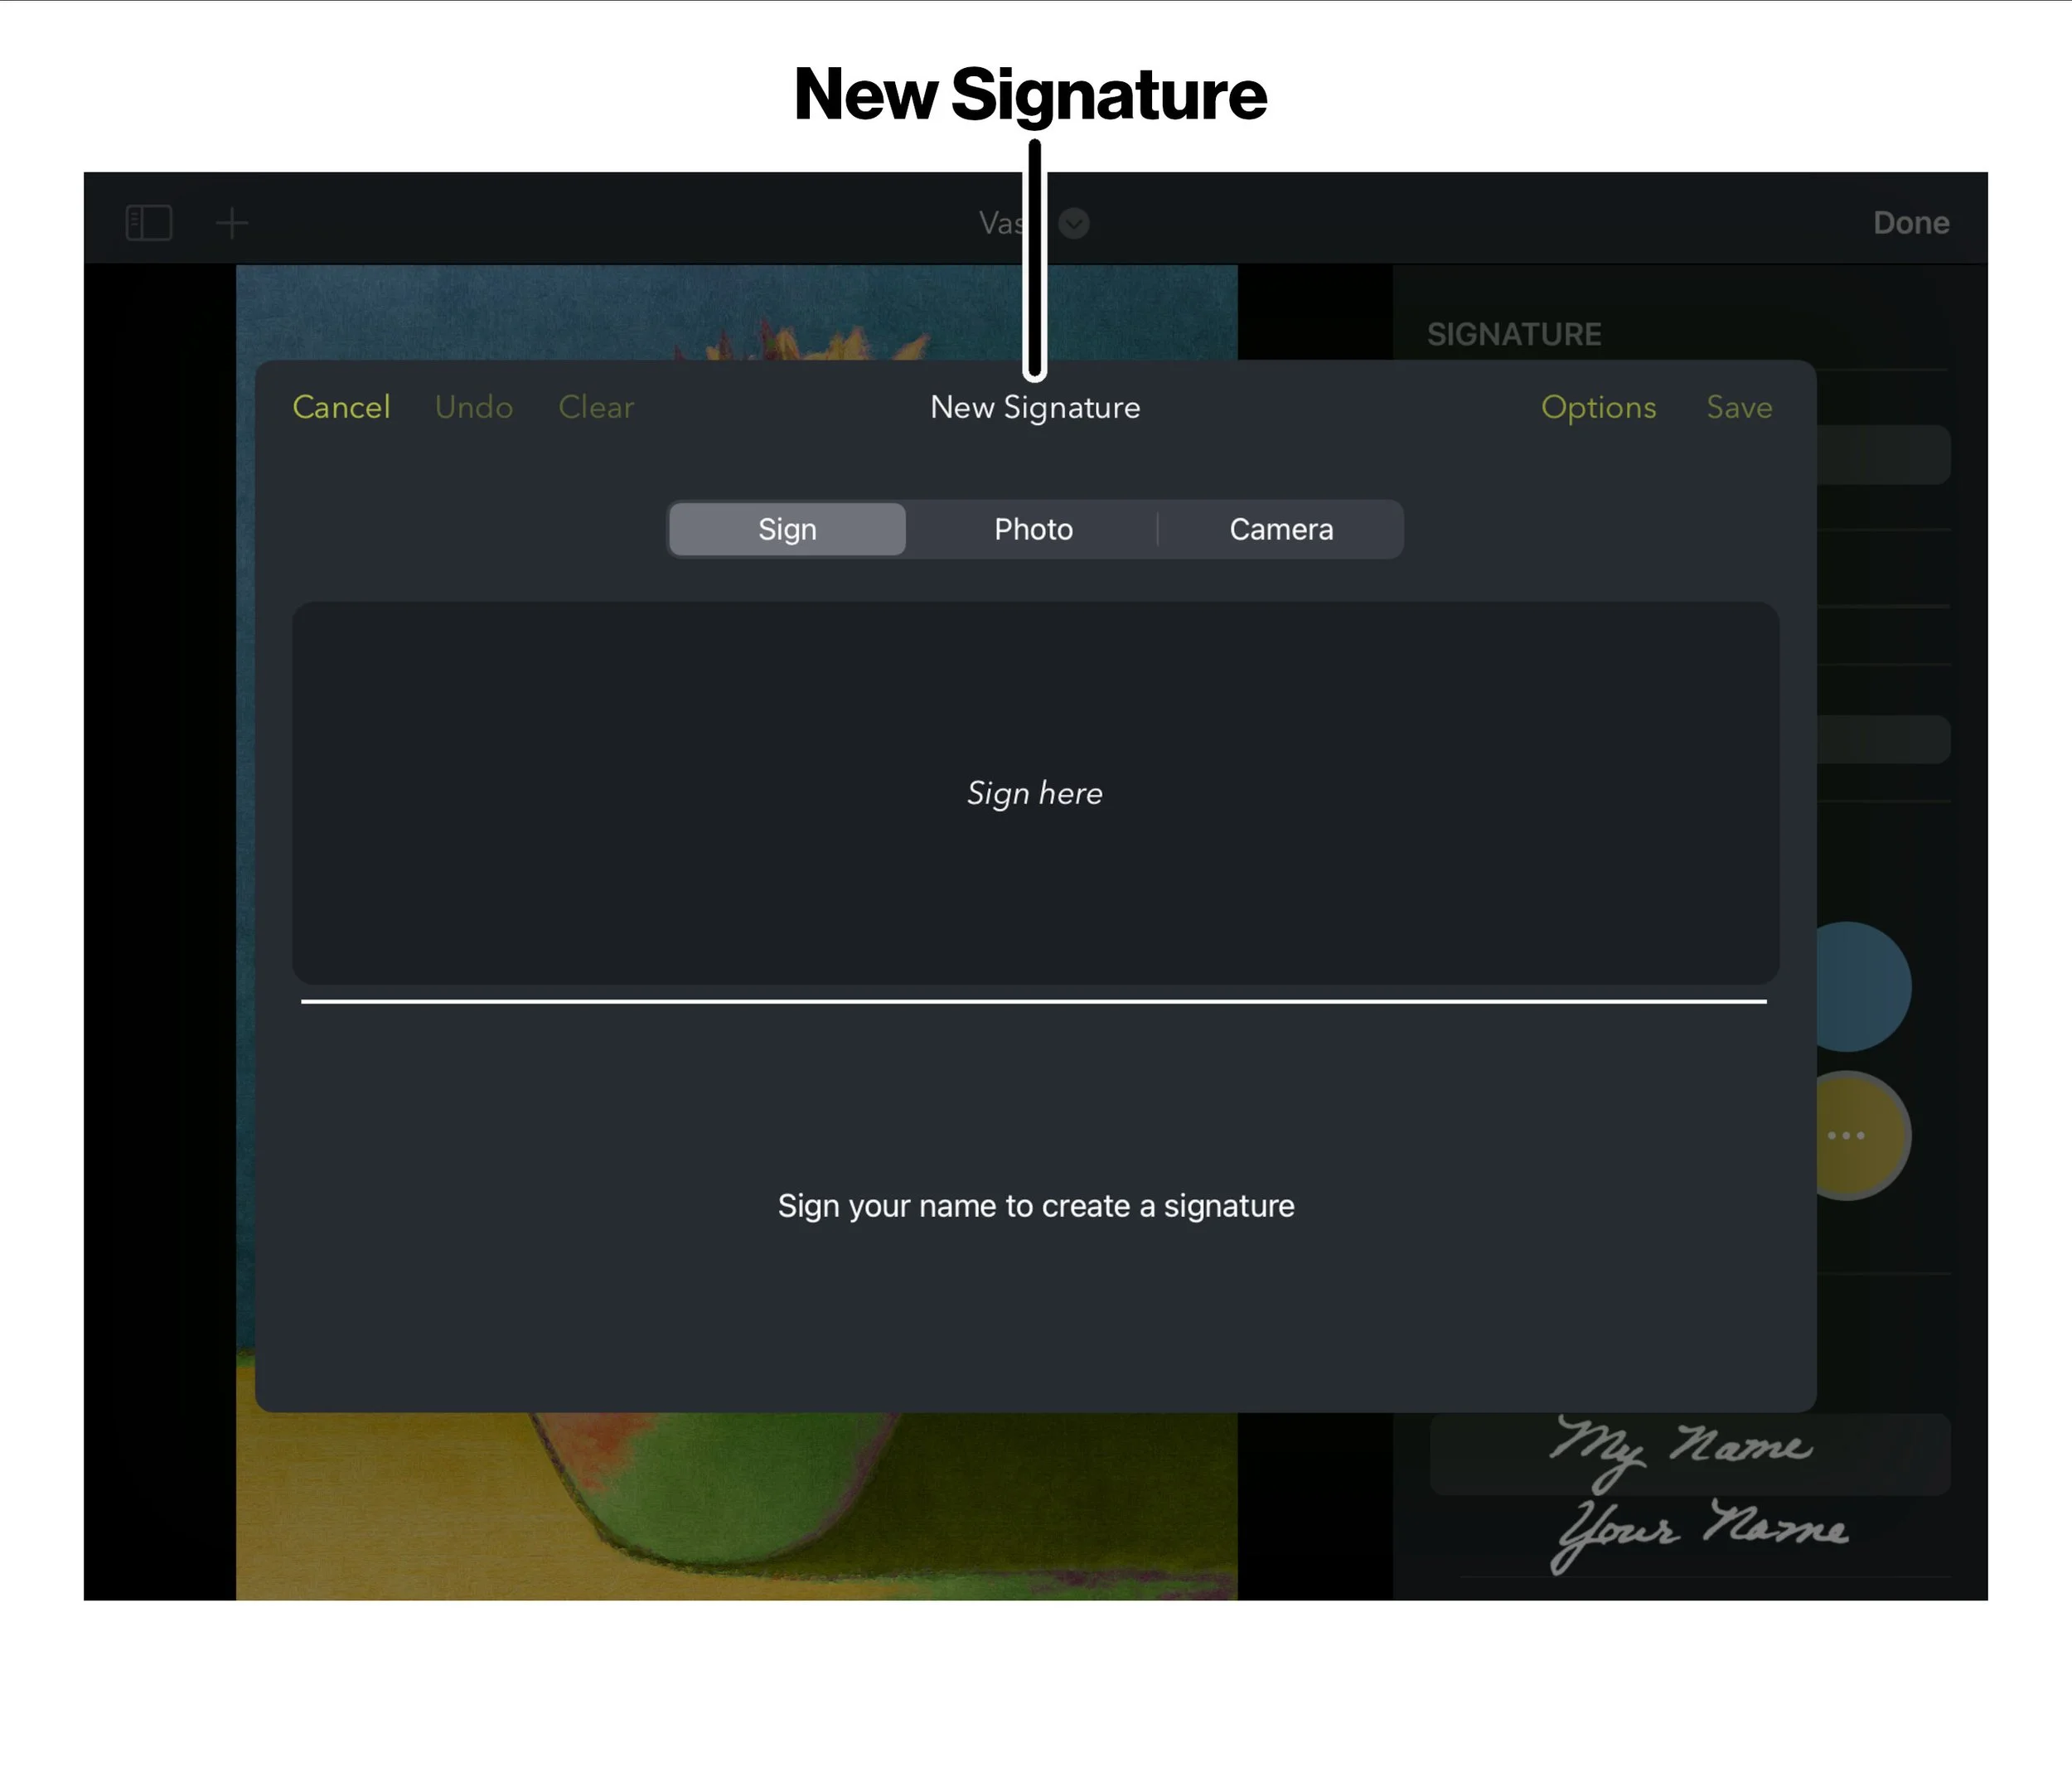
Tap Cancel to exit New Signature without saving the signature.
Tap Undo to remove the last stroke made when using the Sign or to clear the photo when using Photo or Camera.
Tap Clear to remove all strokes made when using the Sign or to clear the photo when using Photo or Camera.
From the Options menu, tap a line width to use when creating a signature using Sign. If tapped on, Smooth Signature will smooth your lines for a more aesthetic appearance.
Save will save your signature.
Crop
Crop reframes, centers, and aligns your image. Crop can be accessed from the Toolbar.
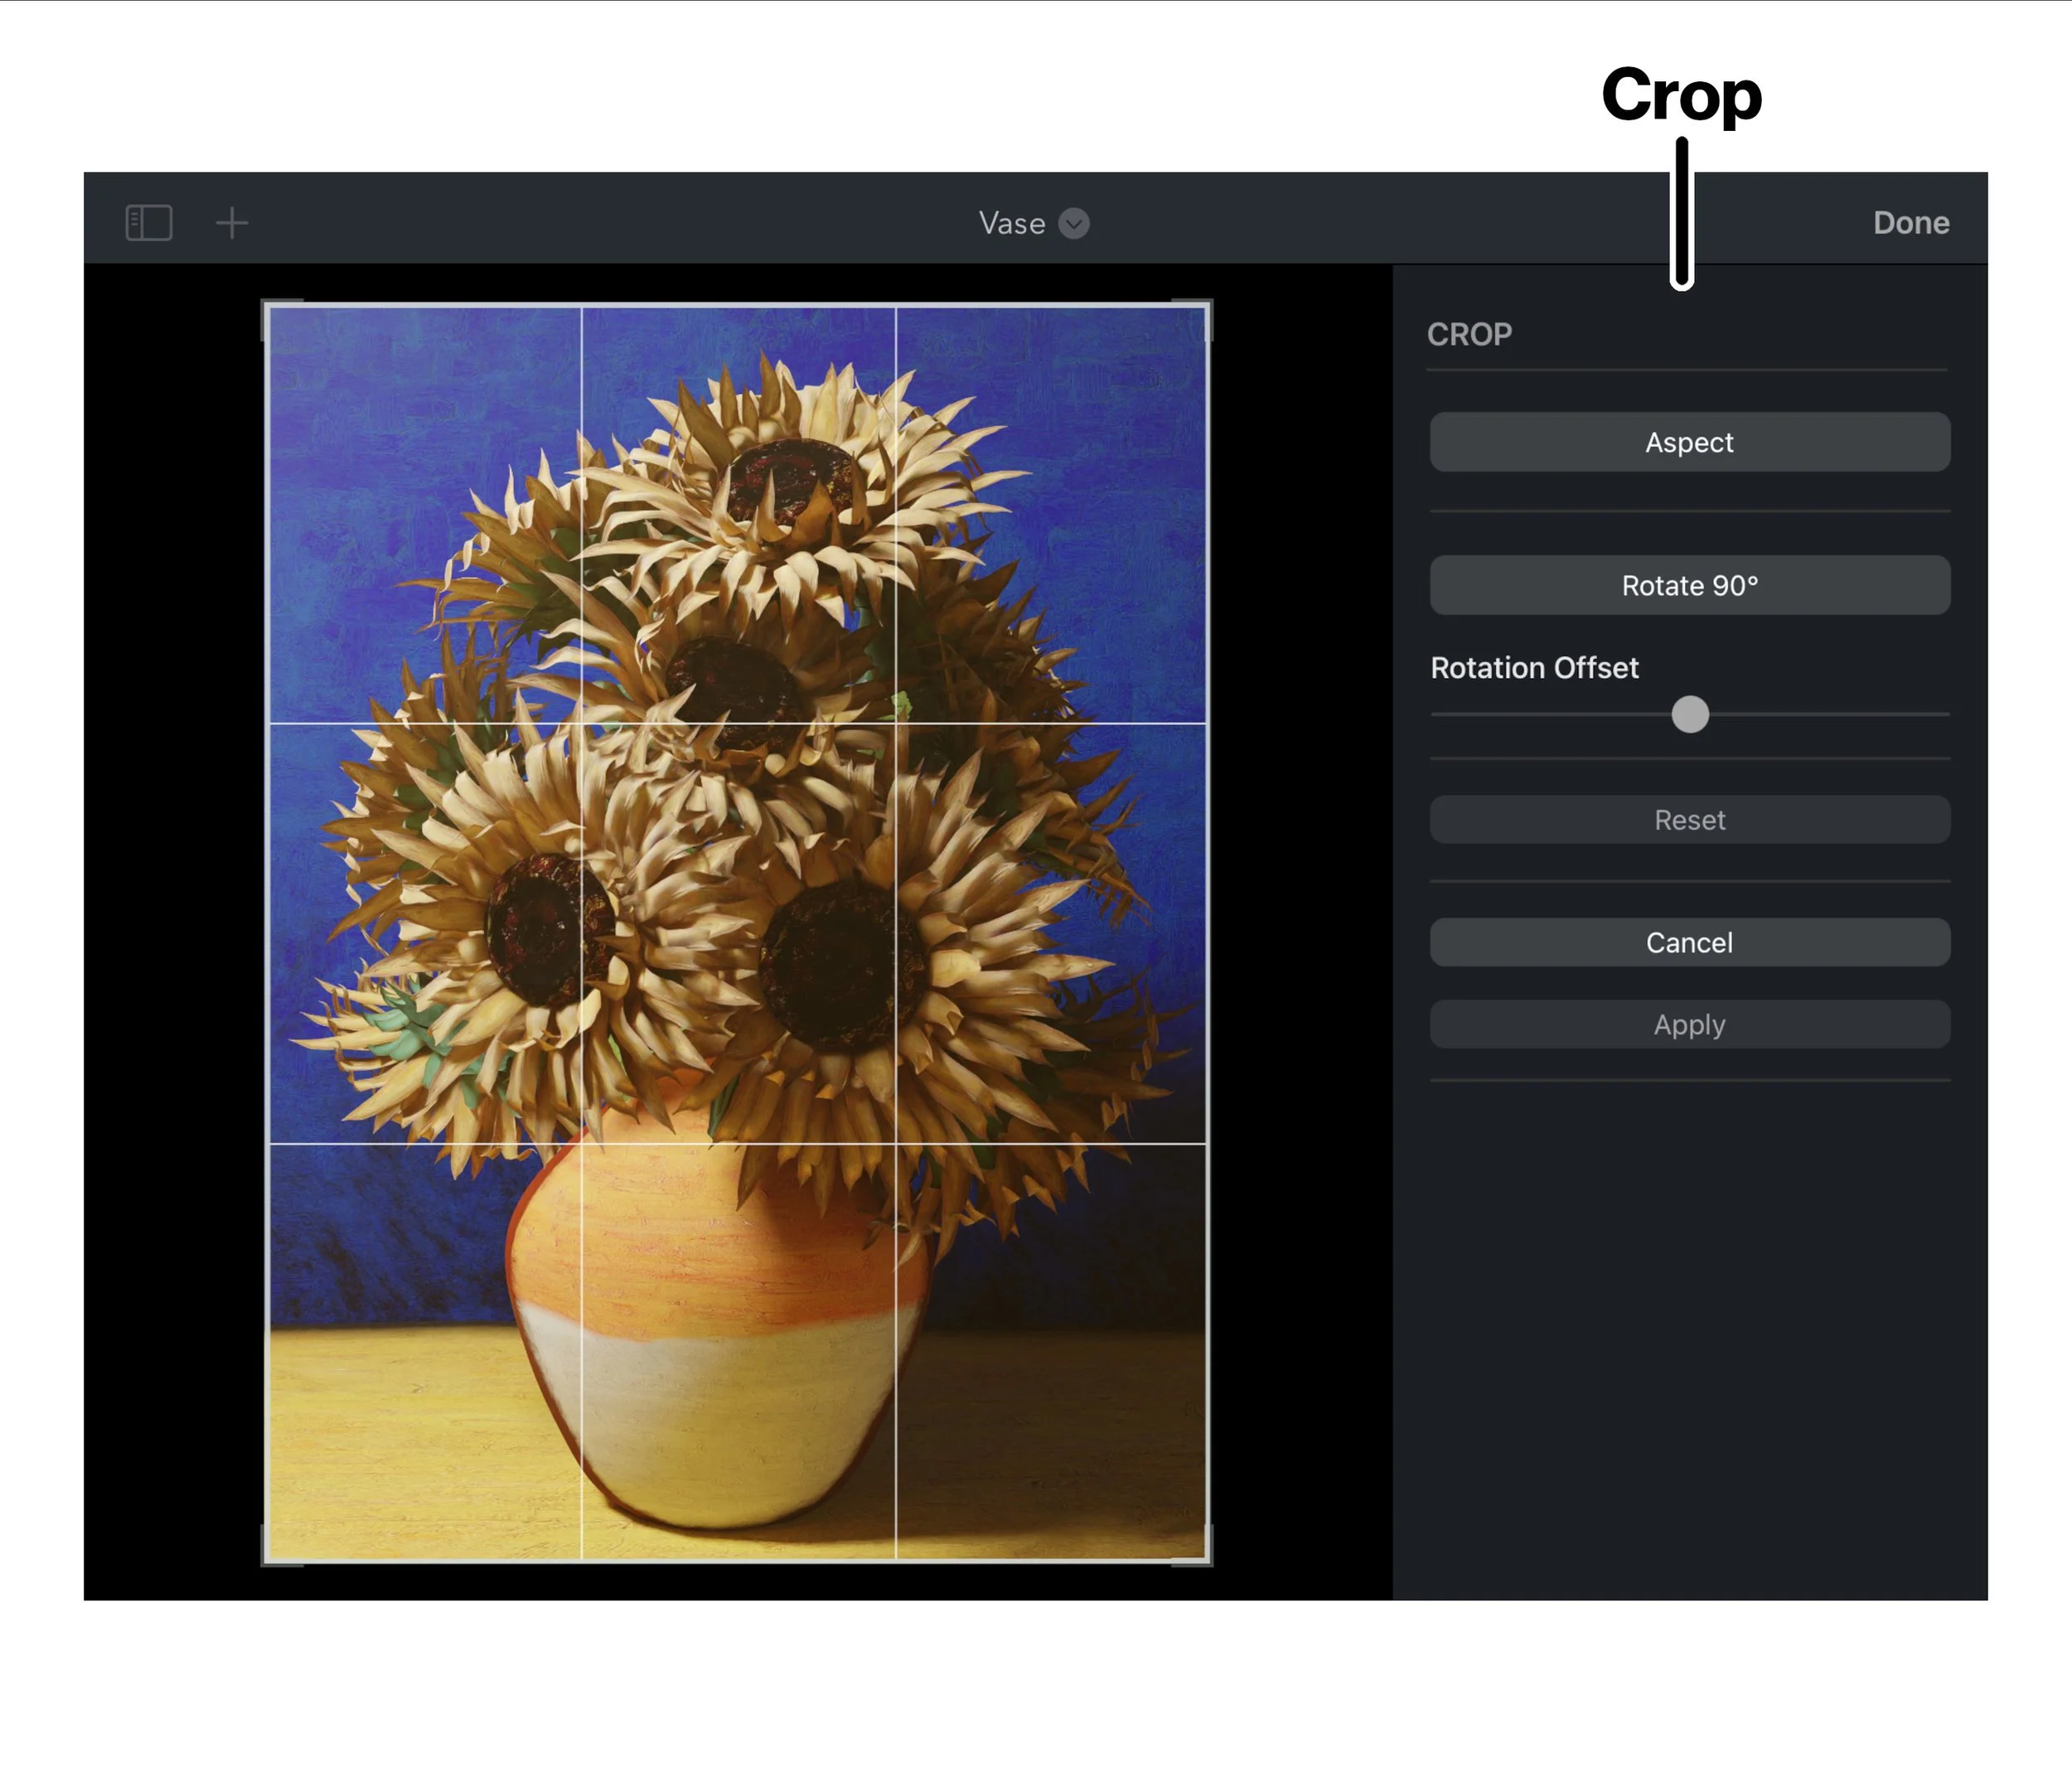
On the image, drag any edge or corner to reframe the image. To rotate, use a two-finger rotatation motion.
Tap Aspect to select a predefined frame defined by an aspect ratio.
Use a pinch to zoom into the image.
Tap Rotate 90° to rotate the image 90° clockwise.
Use the Rotation Offset slider to rotate the image an arbitrary amount.
Tap Reset to reset all crop parameters to their default values.
Tap Cancel to ignore all changes.
Tap Apply to apply all changes.
Ship
Through our printing partner, Canvaspop, you can have your artwork printed on a canvas, framed print, or poster and then shipped to you, ready to hang in your home.
Share
Share your photo or video through email, messages, and others, or save them to Photos or a file. Share can be accessed from the Toolbar.
More Menu
Adjustments
The Adjustments sidebar to the right of the window fine-tunes your art. You can change the contrast, saturation, warmth, white balance, shadows, and highlights, and much more. Adjustments can be accessed from the Toolbar.
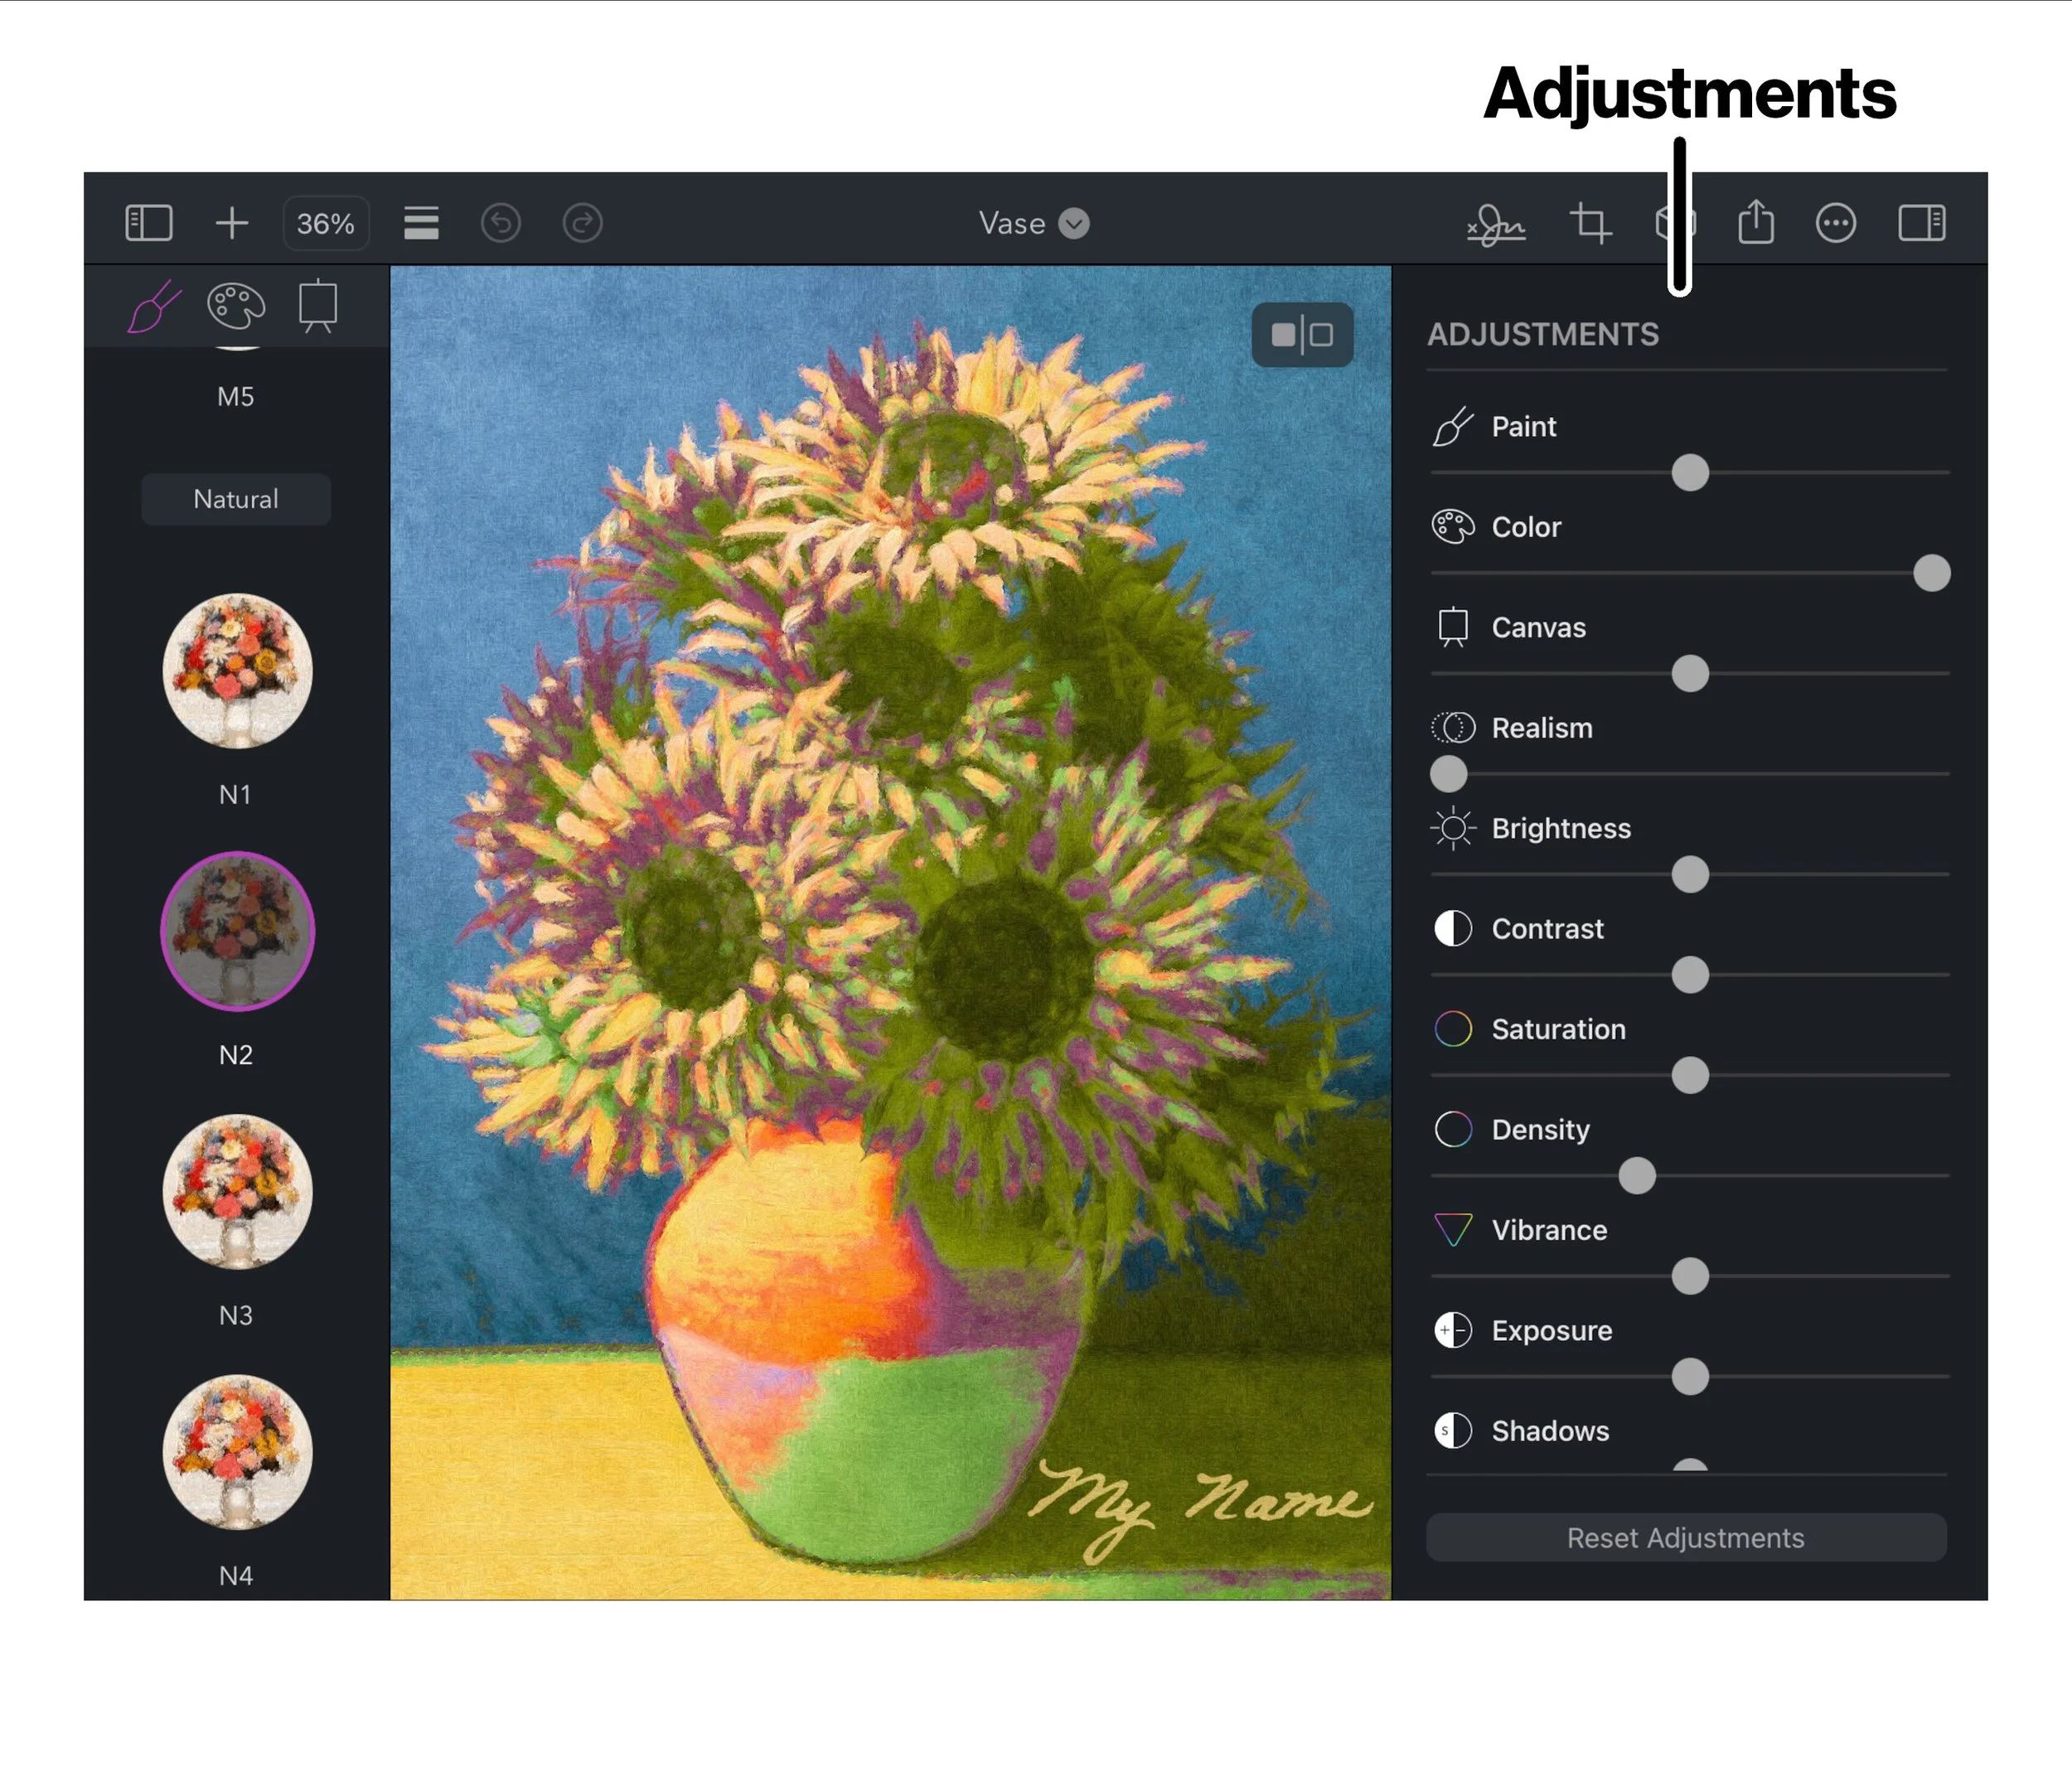
The adjustments include:
Paint - This adjusts the style's detail. A lower value makes the painting more coarse or abstract.
Color - This blends the selected Color Palette with the original image. When using the default Normal color palette, Color will desaturate the original image; this desaturation is applied earlier in the painting process, which differs from the Saturation adjustment, which is applied to the final result.
Canvas - This adjusts how prominently the canvas shows through the paint. In some styles, the canvas may not show regardless of this adjustment due to the specific characteristics of the style.
Realism - This blends in the original image, but it is more than simply blending the final result with the original. Each style will retain its qualities, and the color palette, canvas, and other adjustments should remain unaffected.
Brightness - This linearly adjusts the brightness.
Contrast - This adjusts the range of the darks to the lights.
Saturation - This adjusts the colors to either be more muted or more vivid.
Density - this adjusts the density of colors where there is grain (see Grain) or depth in the canvas.
Vibrance - This is similar to Saturation but works mostly on muted colors and not on already saturated colors.
Exposure - This exponentially adjusts the brightness.
Shadows - This brightens or darkens areas of the image that are already dark.
Highlights - This brightens or darkens areas of the image that are already bright.
Temperature - This adds warmth or coldness to the colors.
Hue - This shifts the hues around the color wheel. For example, this could shift the reds to greens.
Faces - This increases the details in faces.
Thickness - This adjusts the thickness or depth of the brushstrokes, which in turn adjusts how light reflects off of the painting.
Sheen - This alters the shininess of the paint to give it a more low-shine matte or high-shine varnished look.
Grain - Paint can pool when applied, given its wetness. For example, a watercolor painting will have more pooling than an oil painting, which results in dense grains of color. This adjustment controls the dispersion or concentration of that grain.
Texture - Often, how paint is applied in a style and the brush direction will cause variations in color. This adjustment will increase the prominence of those variations or reduce them.
Sharpness - This adjusts the contrast at edges in the image.
Edge - This adjusts how defined edges are. The effect varies from style to style, as what is an edge is defined by the style. Generally, the lower this value is, the more diffuse edges become, or the edges could disappear entirely.
Vignette - This adds darkness or brightness around the border of the image to lead one's eye to the center of the image.
Reset Adjustments
Adjustments have tick marks that indicate their default value. Tap the tick mark to reset the individual adjustment back to its default value.
Tap Reset Adjustments at the bottom of the sidebar to reset all adjustments.
Settings
Settings can be accessed from the More Menu in the Toolbar.
General
Show Welcome Screen - Check this to show the Welcome Screen, which shows example photos to try.
Reduce App Animation - Some interface elements animate. Check this to turn off those animations.
Reset on New Image - If checked, all style settings will be reset when importing a new image.
Video
Use Native Framerate - When using a video, check this to use the video’s native framerate, otherwise an app-specific default framerate will be used.
Export As - The format of the exported video file.
Advanced
Geotagging - Check this to allow photos to be tagged with location information when taken with the camera. Geotagging is off by default.
Keyboard Shortcuts
Brushstroke Pro provides app-specific actions accessed through keyboard commands.
| Item | Keyboard Shortcut |
|---|---|
| New Project | Command-N |
| Open Project... | Command-O |
| Save Project | Command-S |
| Save Project As... | Shift-Command-S |
| Revert to Saved Project | Command-R |
| Import from Photo Library | Shift-Command-I |
| Import from Camera | Control-Shift-Command-I |
| Import from File | Command-I |
| Save Image as JPEG | Command-E |
| Save Image as PNG | Shift-Command-E |
| Save Image as TIFF | Option-Shift-Command-E |
| Print… | Command-P |
| Item | Keyboard Shortcut |
|---|---|
| Undo | Command-Z |
| Redo | Shift-Command-Z |
| Reset to Default | Shift-Command-R |
| Copy | Command-C |
| Paste | Command-V |
| Item | Keyboard Shortcut |
|---|---|
| Zoom In | Command-Plus Sign (+) |
| Zoom Out | Command-Minus Sign (-) |
| Zoom to Fit | Command-0 |
| Actual Size | Option-Command-0 |
| Hide/Show Styles | Control-S |
| Hide/Show Adjusments | Control-A |
| Hide/Show Compare Toggle | Control-C |
| Item | Keyboard Shortcut |
|---|---|
| Next Selection | Up Arrow |
| Previous Selection | Down Arrow |
| Compare | O |